
Description
Image object displays a single image on the page. It is one of the most useful and versatile objects in PubCoder, supporting bitmap or vector image files, and automatically rendering images to optimize export size and to exclude cropped portions.
Double-click on an image object on stage to:
- select an image asset to be placed inside, either from you project’s assets library, from a file or from internet
- crop the current image inside the object
- edit the current image in an external editor
- click more to display the asset menu for the current image asset
Other image properties are available in the selection inspector
Using bitmap images
The image object supports the most commonly used image file formats, including PNG, JPEG, GIF but also some formats that are not usually used in web or digital publishing environments, like TIFF, BMP and even PSD (Adobe Photoshop) files.
Please also note that PubCoder ignores Photoshop layers, which are seen as “flat” pictures.
PubCoder will actually render pictures used in image objects and save them in a web-savvy format (PNG or JPEG) by default, including only the portion of the image that is visible to the user after applying crop settings, and also exporting only the necessary pixels to fully support the Pixels Density chosen by user in the project inspector (see Image Optimizations for more informations on this topic).
Image rendering allows to optimize image size and loading on the page, but you can always prevent PubCoder from re-rendering a specific image object by turning on the option Use Original Image in the selection inspector. Doing this, PubCoder will include the original image asset “as is”, without doing any conversion or compression. This can be useful if PubCoder compression does not satisfy you or to obtain better color matching, but please note that using original images means that performances and compatibility will be absolutely up to you, since you’re bypassing all PubCoder automatisms: be sure to use a web-savvy picture (PNG, JPEG or GIF, don’t expect PSD or TIFFs to work in a browser / reader) and double-check the image size (resize you 20-something megapixel images coming from your reflex camera) before using this option.
Using vector images
Vector images use mathematical descriptions to represent an image, as opposed to describing the color of each pixel in a bitmap image. This usually lowers the size of the image and also makes it possible to scale the image at whatever size on the stage without pixelating it.
PubCoder supports vector images in SVG (Scalable Vector Graphics) format, which is the standard format for vector images to be displayed on the web. SVG is a format based on XML and has many options, with each browser supporting a subset of those options, so please be sure to check how the image is displayed on the various readers / browser when using SVG.
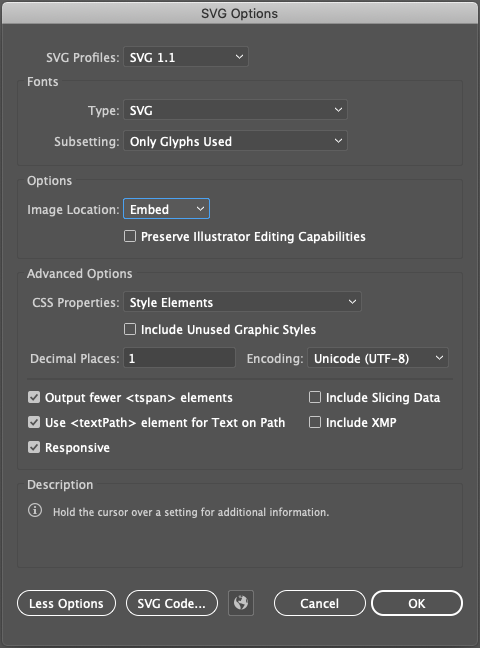
You can export an SVG file from almost any vector image editing software, like Adobe Illustrator and others. Please try to stick with these options - here displayed in an Adobe Illustrator “Save As” window, but similar options are available in other applications as well - when exporting to SVG to maximize compatibility and avoid validation issues:
When using vector images in your layout, PubCoder will also show an additional option to Rasterize Image in the selection inspector, doing this will convert the image to a bitmap when exporting, ensuring that what you actually see on stage is exactly what you will get in your export, at the cost the cost of raising the image size. Being rasterized starting from a vector images, rasterized image will not be pixelated on stage - unless applying a scale action.
Crop Image
The image object is actually a container for an image asset. So you can decide how and where to fit the image asset in the image object, this is called cropping.
When placing an image in an image object or resizing it, an automatic cropping is applied, basing on the kind of image contained in the object:
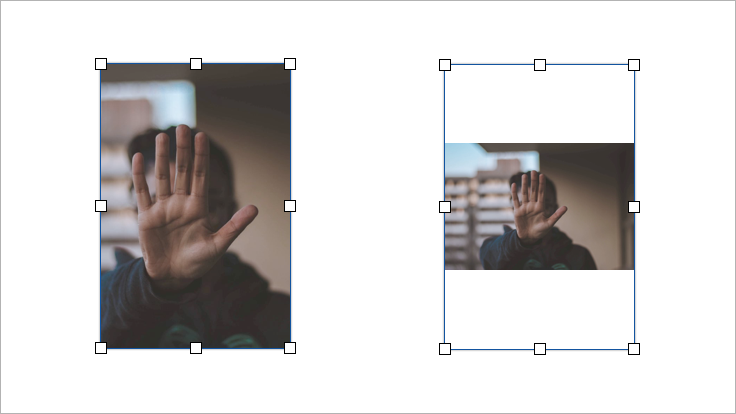
- Fill Object is the default for images without alpha channel: the image will be centered to the object and scaled to fill the object entirely, eventually cutting some portions of the image
- Fit to Object is the default for icons or glyphs images with an alpha channel: the image will be centered to the object, and scaled to display it entirely, eventually leaving some portions of the object empty:
- Center: similar to Fit to Object, but the image will never be enlarged (aka zoomed over 1x)
Here you can see an example of Fill (left) vs Fit (right) crop:
When automatic cropping isn’t enough, you can fine-tune it using manual cropping, which can be accessed by double-clicking the object, right-clicking the object or hitting ⌘K (ctrl-K on Windows). Entering crop mode will display bring up the crop window:
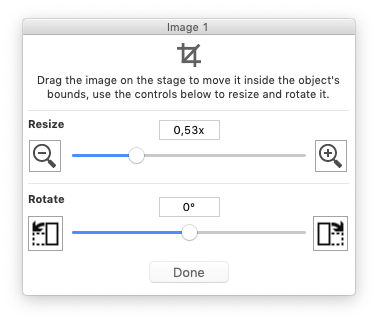
While in crop mode, you can drag the image on stage to move it inside the image object, and use the controls on the window to enlarge/reduce it and rotate it. When you are done, click Done or anywhere outside the object on the stage to exit crop mode.
Color Overlay
Color Overlay is a handy feature that you can enable for a specific image object in the selection inspector, it allows you to fill the opaque (non-transparent) portions of your image with a fill color. This allows to quickly colorize both bitmap and vector glyphs and icons, e.g. those imported using the Import from Internet functionality.
Properties
Image object supports most of the Generic Object Properties, plus the ones listed below. To edit properties of an image object, select it and use the selection inspector at the right of your project window.
| Image | The image displayed by the Image Object |
| Alternative Text | A textual description of what’s inside the image, which will be converted in an ALT attribute that some readers may use to improve accessibility to visually-impaired users |
| Color Overlay | Enable and choose a color to fill the opaque portions of your image. more informations |
| Use Original Image | Available only when using bitmap images, allows to skip image rendering by PubCoder. more informations |
| Rasterize | Available only when using vector images, enabling this will convert the image to bitmap when exporting. more informations |
| Crop ▹ Auto Crop Mode | One between Fill Object, Fit to Object and Center, defines how automatic cropping is applied more informations |
| Crop ▹ Delta X | Defines the offset of the image from the horizontal center of the image object |
| Crop ▹ Delta Y | Defines the offset of the image from the vertical center of the image object |
| Crop ▹ Rotation | Defines the rotation of the image inside the image object |
| Crop ▹ Zoom | Defines the zoom to apply to the image (1.0 means use original image size) |
Events
Image object triggers all Generic Events. To edit event handlers for an image object, select it and use the Interactivity Panel on the right side of the project window.
Actions
Image object can be used as target of most Generic Actions, plus:
Switch Image
Applies another image to the image object, using the same crop parameters of the original one (so be sure to use images of the same size). A fade effect can be used and a sound can played while switching the image.
Properties
| Target | image object to be switched |
| Image | new image to apply |
| Fade Duration | the duration of the fade effect, in seconds. Use 0 to switch the image without fade |
| Audio | sound to be played when switching the image |
| Back and Forth | when enabled, subsequent executions of the action will switch back and forth between the image specified in the action and the original image placed in the image object |
| Back Sound | an alternative sound to be played when switching back to the original image |