PubCoder features an InDesign import functionality that allows you to import layouts and assets from one or more Adobe InDesign documents into a PubCoder Project that is perfectly editable after the import, complete with layers, assets and real text.
How it works
PubCoder’s InDesign import works in a totally automated way and you can skip this paragraph safely, but if you’re curious about what’s happening under the hood, here it is.
At first, PubCoder will connect to Adobe InDesign, and execute scripts to open the document and scan it to copy the various informations about objects and layers positions, and import all linked resources in the InDesign file as assets in PubCoder, when possible. Some specific images may be rendered for better performance, e.g. geometric forms that do not have a corresponding object in PubCoder.
Text is imported in a second stage: PubCoder will ask InDesign to export the document in EPUB 3 fixed layout format, then PubCoder will scan this document to import text and CSS styles for text formatting, that will be appended to the project’s CSS code.
At the end of the process, you will have a completely editable PubCoder project, with one (or more) object(s) for each object in the InDesign document.
Create a new project starting from InDesign layout(s)
Start by creating a new project (File → New Project) and choose to Start from InDesign file. You will be asked to select a few files to import: you can add them dropping them on the files area or clicking the + button, then you can adjust their import order dragging them.
PubCoder will then launch InDesign and check that everything is OK with the documents, warning if it finds:
- Links to missing resources: your InDesign document is linking to resources (e.g. image files) that cannot be found on disk
- Missing Font files: your InDesign document is using some font that is not installed on your computer nor it can be found in the package
- Incompatible Fonts: your InDesign documents uses fonts that are not compatible with PubCoder, you’ll learn more about this later
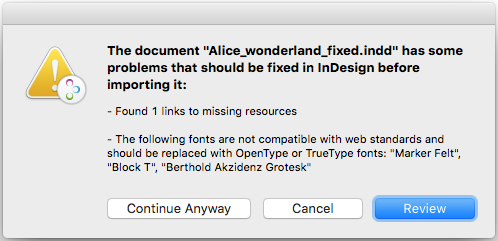
This warning will not block PubCoder from importing your InDesign document, but will affect the quality of the import: missing images will not be present or will be imported in low quality, text will not use the correct fonts and so on. Our advice is to click Review to open the document in InDesign and fix those issues here, then try to import the file again in PubCoder.
Next, PubCoder will present the import settings panel:
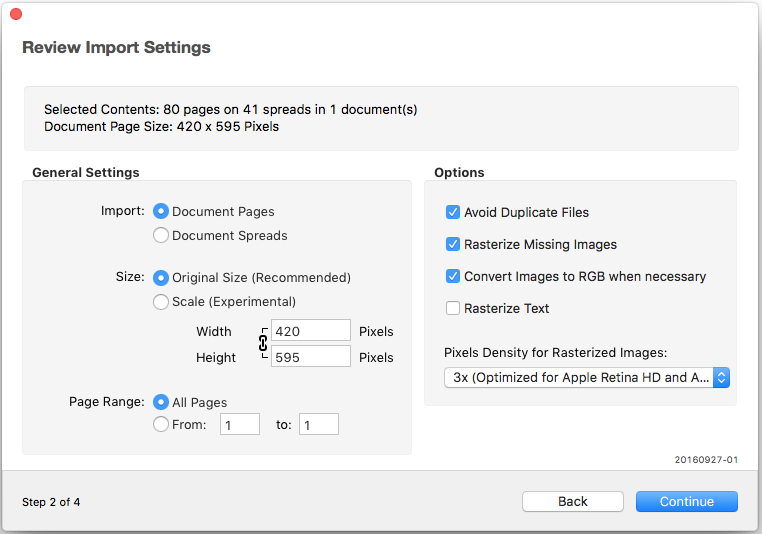
You may be fine with the default settings and just need to click Next to actually start the import process, which will go on without further intervention by the user. The process can be stopped at any stage and will eventually display a report of problems encountered.
Detailed descriptions for each settings follows.
Import Document Pages or Spreads
In the first case, PubCoder will create a new project page for each page in the InDesign document, in the second case PubCoder will create a new project page for each spread in the InDesign document: this is useful if you want to create a landscape eBook starting from an InDesign document with contents in between facing pages
Size
Allows to control the size of the imported content. Our recommendation is to stick with the original size of the document: this guarantees the best fidelity to the original layout and also the content will be scaled properly by the reader app or device without losing any quality, since PubCoder imports real text and real assets rendered up at 3x their original size. An experimental scaling feature is also provided, but you may obtain better results by scaling the document in InDesign before importing the file.
Page Range
Choose if importing the whole document or a range of pages only
Avoid Duplicate Files
If the import process will produce a file that is identical to another file already present in the project (e.g. content present on another page or even in another imported document), it will use the already existing file instead of importing another copy. This is enabled by default.
Rasterize Missing Images
If the document links to an image file that cannot be found, this option allows to import a low-quality rendered version of the image anyway. This is enabled by default.
Convert Images to RGB when necessary.
Converts CMYK images to RGB and imports only RGB documents. This is slow and should be enabled only if the original images should not display correctly in PubCoder.
Rasterize Text
This option allows to import a rendered image for each text-box, instead of the real text, should you need it.
Pixels Density for Rasterized Images
PubCoder imports the real image files linked to your documents, but also produces rendered images for some elements that are not directly supported in PubCoder, for example some geometric forms and some vector images such as EPS, PDF or Adobe Illustrator files: this setting allows you to increase the original resolution in order to support high-resolution displays and to allow scaling up without pixelating images. The default setting is 3x.
Importing in an existing project
PubCoder also allows to import InDesign assets and layouts into an existing project (File → Import Assets from Adobe InDesign). The procedure is the same but with two differences, the first is that PubCoder will try to scale the content to match your project size, the second is that pages but also CSS code will be appended to your project.
Our advice is to always start creating a new project directly from InDesign files like we described in the previous paragraph. If you need to “add” other files later, please be sure to name those files differently to avoid CSS conflicts.
Editing Text
To guarantee that what you’ll see in PubCoder is the nearest as possible to what you see InDesign, PubCoder encapsulates CSS data in your project to obtain fixed positioning of each word (this data is actually derived from InDesign’s own EPUB Fixed Layout export of the document). As already said, this will give the best possible match to what you see in InDesign, but on the other side it will make text editing cumbersome, because the text won’t “wrap” automatically when modified.
This may not be an issue at all if you don’t need to modify the text. Should you need to modify text object imported from InDesign, double-clicking the object will result in PubCoder asking the following:
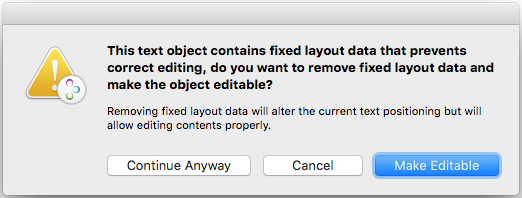
Clicking Make Editable will remove fixed layout data, thus making your text easily editable but loosing the original text positioning and wrapping. If you simply need to fix a typo, you may try to use the Continue Anyway option, that will allow you to edit the text as-is, preserving the fixed positioning of each word.
Fonts compatibility
Since PubCoder uses web technologies to assemble your contents into all supported formats, it needs to work with font that are compatible with web standars. Specifically, PubCoder supports TrueType (.tt or .ttf extension) or OpenType (.otf extension).
To use the same fonts used in your InDesign document, you have to make sure that they are in TrueType or OpenType formats. InDesign documents often use PostScript Type 1 and other formats that simply won’t work in EPUB or other web-based formats (the same InDesign is unable to use them in its EPUB export) and need to be converted and replaced in the original InDesign document.
Before importing an InDesign document, PubCoder will check fonts used in the document and eventually warn if unsupported fonts are found. In this case, our advice is to export a package of your InDesign document (menu File → Package) if it’s not already packaged (otherwise simply save the document as a copy). This will export your document together with two folders: Links and Document Fonts and allows you to easily identify fonts to be replaced in the Document Fonts directory (simply check file extensions).
You can use software like TransType or FontXChange (both available for Mac and Windows) to convert incompatible fonts to TrueType or OpenType format, saving them in a new folder, say “Document Fonts (Converted)”.
Once fonts have been converted to TTF or OTF, move incompatible fonts in another folder, maybe named “Document Fonts (Disabled)” and move the individual converted font files in the Document Fonts folder.
You can now re-open your packaged document in InDesign, and it should complain about missing fonts (unless the fonts you moved to “Document Fonts (Disabled)” are also installed on the system). Now you will need to replace in the InDesign document the fonts you just replaced as files in the Finder. Choose menu Type → Find Font and a window like this should open:
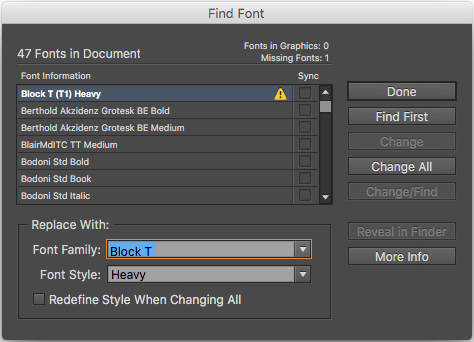
For each font replaced, you have to select it, select the corresponding font family and style of the font converted to TrueType or OpenType and click “Change All”. Note that the original font used may be labelled with a suffix (like “T1” for “Type 1”) and that the fonts contained in the “Document Fonts” folder should appear at the top of the list.
When you’re done, save and close the document in InDesign: you can now import the fixed version of the document safely in PubCoder (remember to select the new, fixed InDesign file in PubCoder since the previous may still be selected).
For more informations about fonts in PubCoder, please check the Fonts Troubleshooting section.