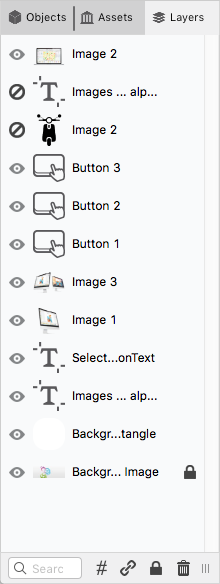
For each object dragged onto the stage, a layer in the Layers panel will be created. The layer specifies the stack order of the object. An object with a higher position is in front of an object with a lower position. You can select and drag any number of layers in the layers panel to rearrange their order.

Each row in the layers panel represents a specific layer, displaying a preview of the contained objects, the layer name (double-click to edit) and eventually some status icons on the right. On the left of each row, you will find an eye icon, which can be enabled or disabled to switch the layer visibility on the stage.
Important: Layer name and visibility are used only on the PubCoder stage so that you can find and edit objects easily while authoring contents: the layer name will not appear in the export at all, and turning off layer visibility will not actually hide the corresponding object in the export! If you want to hide an object, e.g. to show it later using a Show action, enable its Hidden property in the selection inspector
At the bottom of the panel you can find:
- Search Field - allows to filter out the layers basing on their name
- Hash icon - allows you to display the identifiers of each object in each layer. This is usefult when you write custom code and need a ID of the object for reference
- Chain icon - allows you to chain/link the selected layers together and to move them together on the stage. Chained layers will display a chain status icon in their row in the layers panel, when one of the layers of the chain is selected
- Lock icon - allows you to lock the selected layers, so it will be impossible to select and modify them on stage. Locked layers will display a lock status icon in their row in the layers panel
- Trash icon - allows you to remove the selected layers and the corresponding objects