Introduction
PubCoder includes a built-in AI Assistant that lets you create and edit your projects by chatting: describe what you want in your own words, and the assistant makes the changes for you directly in your project, on the real pages and objects you can see on the stage.
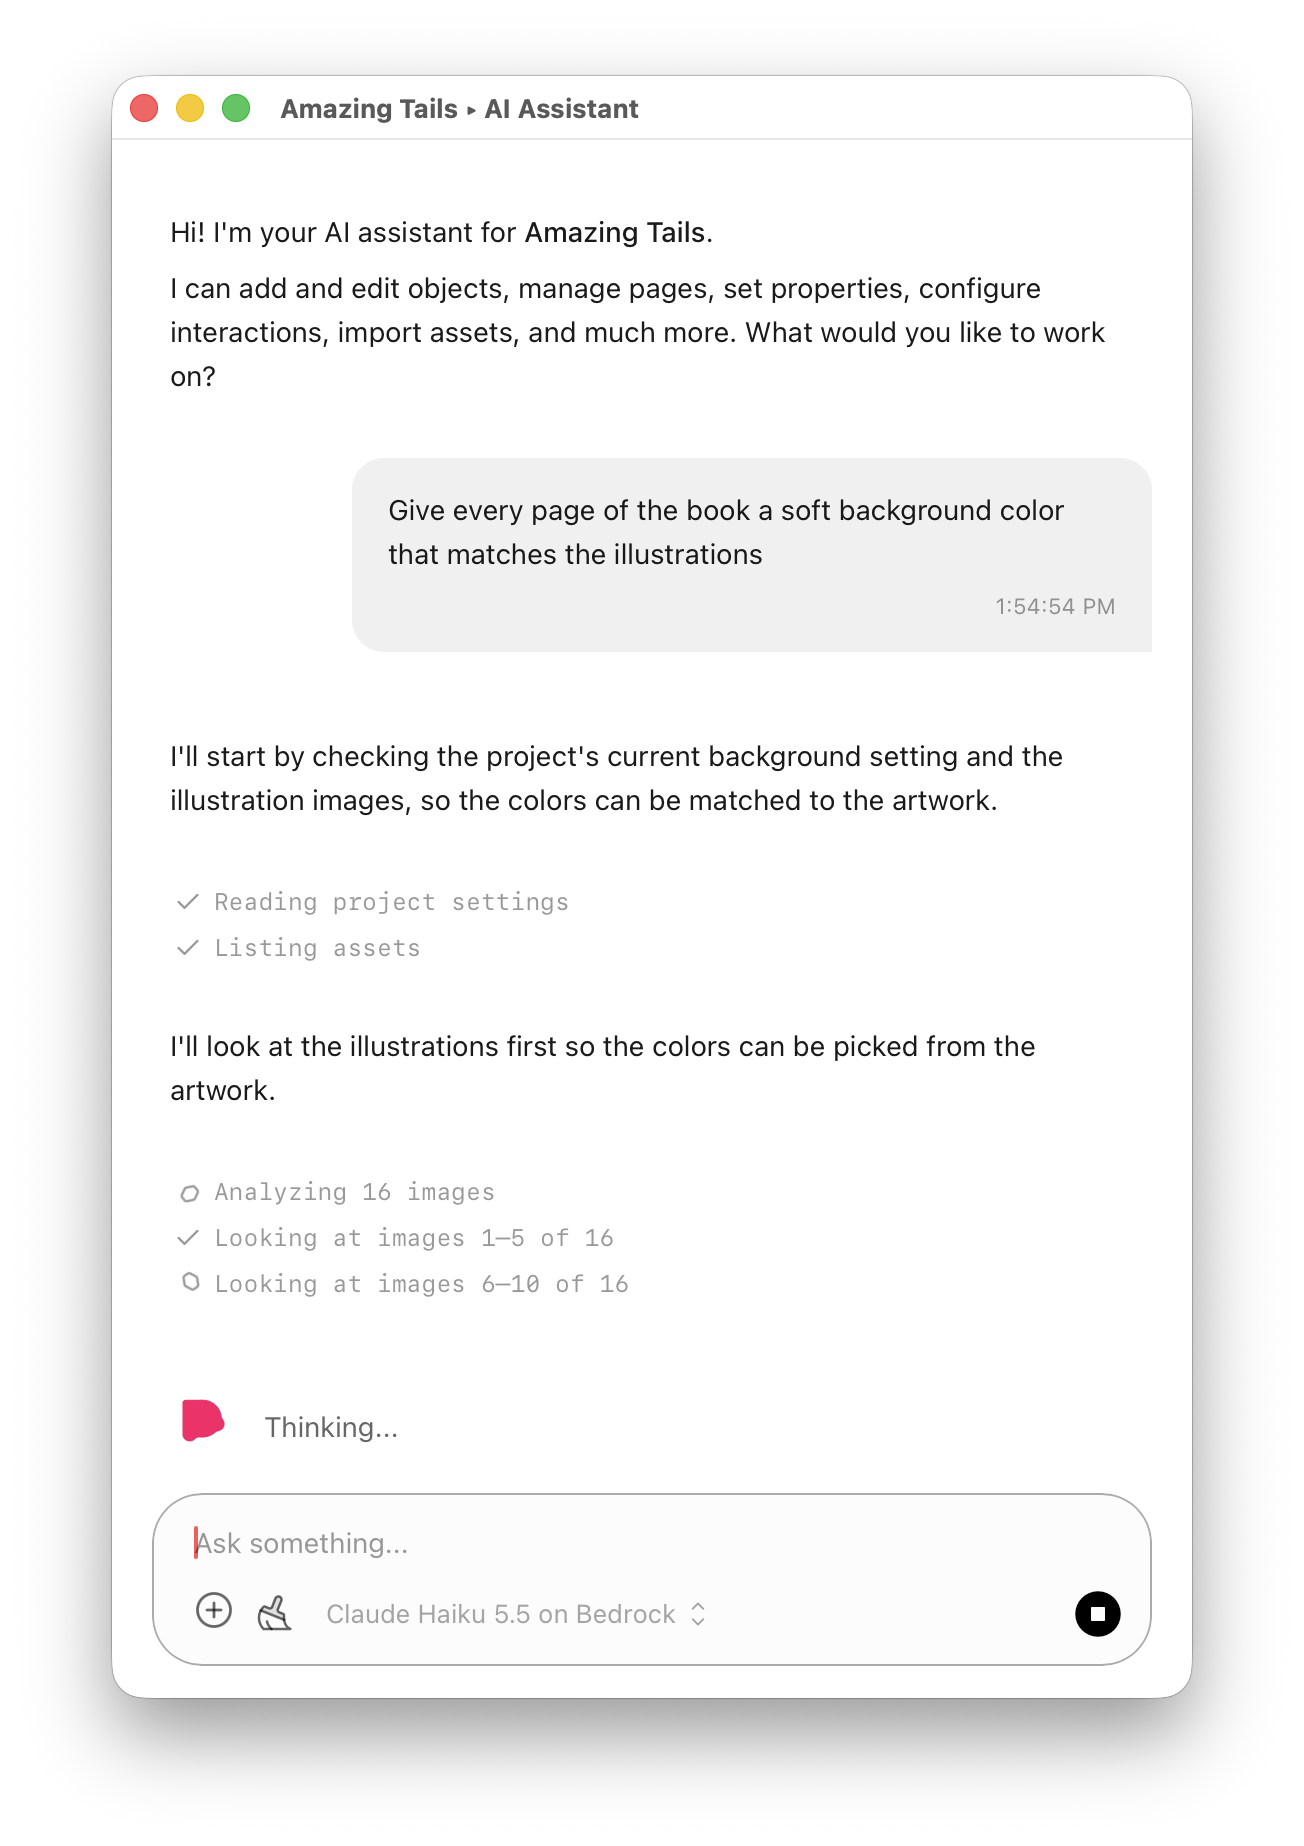
You can start it right from the Start Window to create a whole new project from your own material (see Starting a new project with the AI Assistant) or from an existing project by clicking the AI Assistant button in the toolbar or by choosing Window ▹ AI Assistant from the menu bar.

You can ask it to set up a layout, add objects and widgets, fill a quiz with questions, add interactivity, apply the same change to hundreds of pages, and import images and documents. Every change is made with the same objects, properties, events and actions you use in PubCoder, so you can always review the result, adjust it by hand and undo it.
Setting up the AI Assistant
To use the AI Assistant you need:
- PubCoder Pro. The AI Assistant is one of the PubCoder Pro features. If your subscription does not include PubCoder Pro, PubCoder shows the Upgrade to PubCoder Pro window when you open the AI Assistant: from there you can try the Pro features free for 7 days, when available for your account, or upgrade your subscription.
- An API key from one of the supported AI providers. PubCoder does not include an AI service: the assistant uses an AI model from the provider you choose, with your own account and API key (bring your own key). The supported providers are:
- Anthropic Claude: create an API key in the Claude Platform
- OpenAI (GPT): create an API key in the OpenAI Platform
- Google Gemini: create an API key in Google AI Studio
- Amazon Bedrock: create an Amazon Bedrock API key in your AWS console
- An Internet connection, to talk to the AI provider and to load the list of available models: the AI Assistant is not available offline.
Before the first conversation, enter your API key in PubCoder’s settings: choose PubCoder ▹ Settings… on Mac or Edit ▹ Settings… on Windows from the menu bar, then click the AI Assistant tab. If you open the AI Assistant before setting an API key, PubCoder tells you and offers to open the settings directly on the AI Assistant tab.
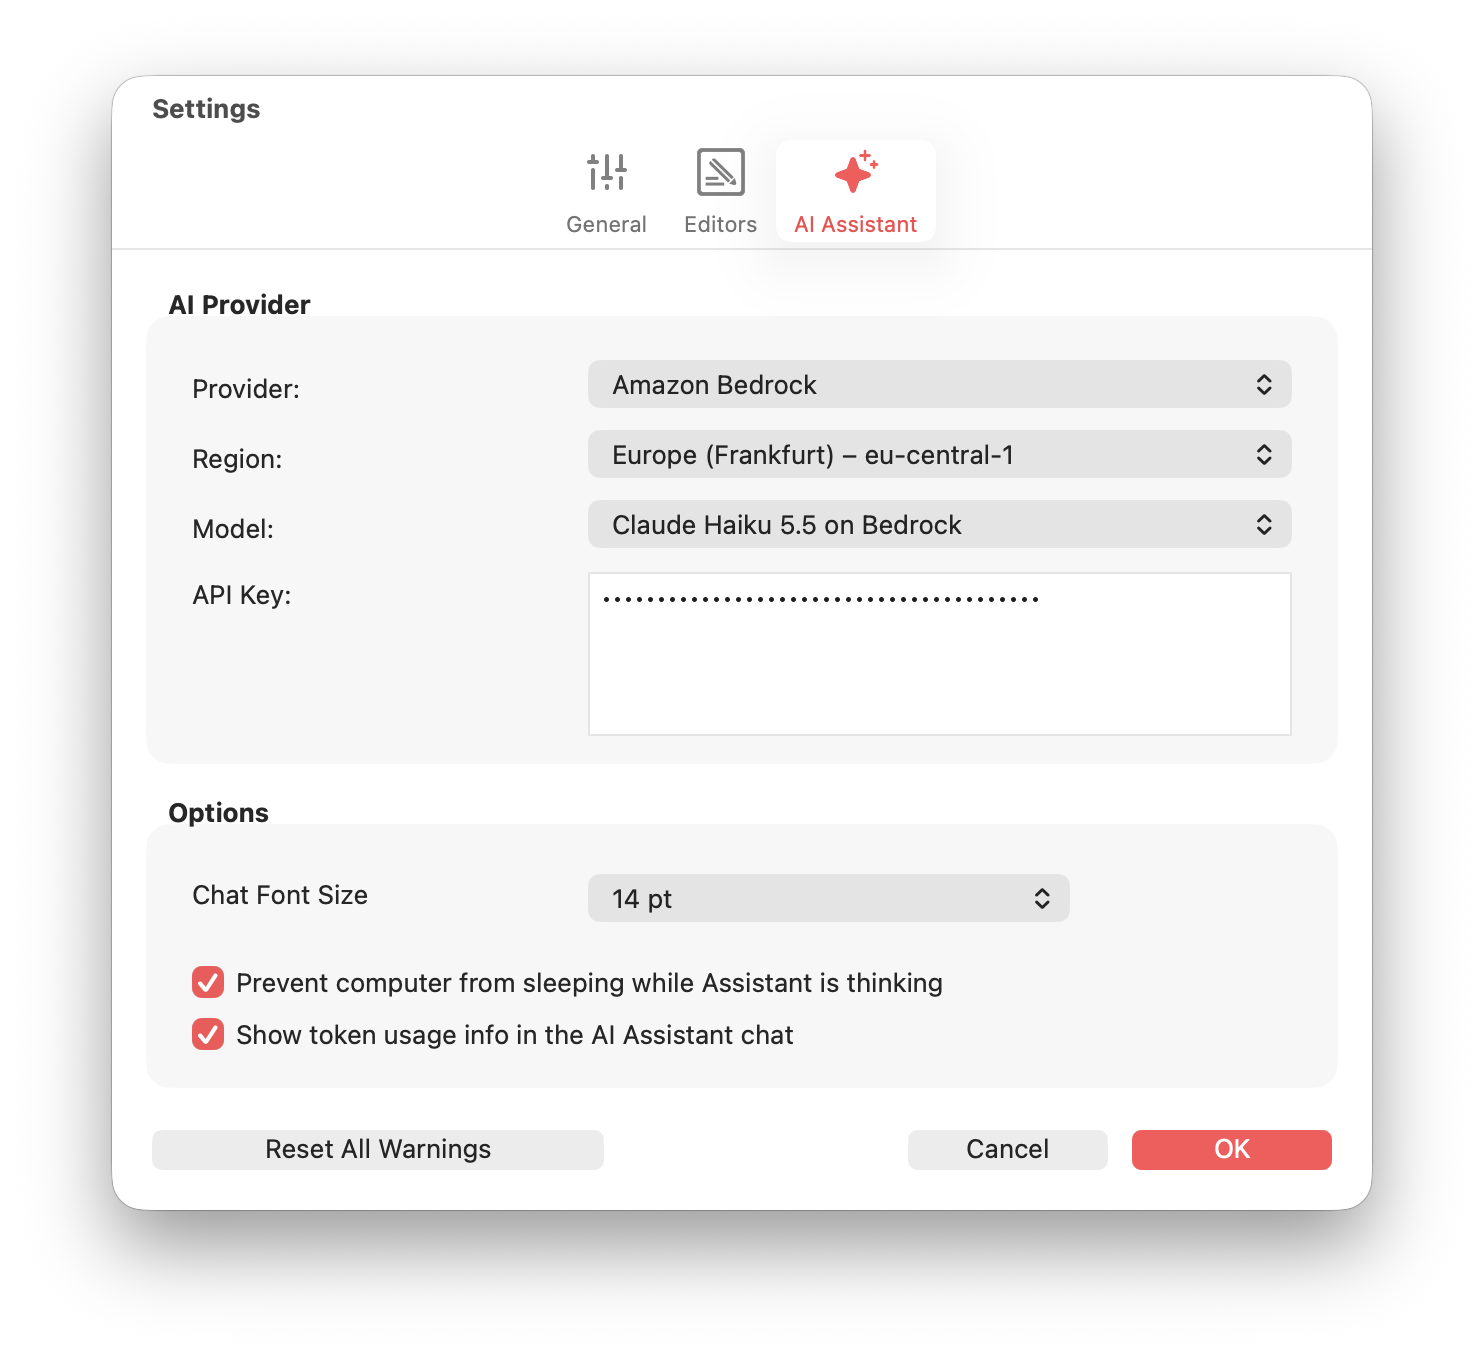
The AI Provider section defines which AI service the assistant uses:
| Provider | The AI provider to use: Anthropic Claude, OpenAI (GPT), Google Gemini or Amazon Bedrock |
| Region | Only for providers that are available in several regions, such as Amazon Bedrock: the region of the service to use |
| Model | The AI model to use among those offered by the selected provider. More capable models usually give better results on complex tasks but are slower and more expensive |
| API Key | Your API key for the selected provider. Each provider keeps its own API key, so you can switch provider without entering the key again |
The list of providers and models is kept up to date by PubCoder and loaded from the Internet, so new models become available without updating the app. If a model you selected is no longer offered, PubCoder selects another one and tells you.
The Options section lets you customize how the assistant works:
| Chat Font Size | The size of the text in the AI Assistant window |
| Prevent computer from sleeping while Assistant is thinking | Keeps your computer awake while the assistant works on a long task (the computer is always allowed to sleep when the assistant is idle or waiting for your prompt) |
| Show token usage info in the AI Assistant chat | Shows the amount of tokens used by each request in the chat, useful to keep an eye on costs. |
PubCoder stores your API keys encrypted on your computer and uses them only to talk to the provider you selected.
Using the AI Assistant
The AI Assistant window
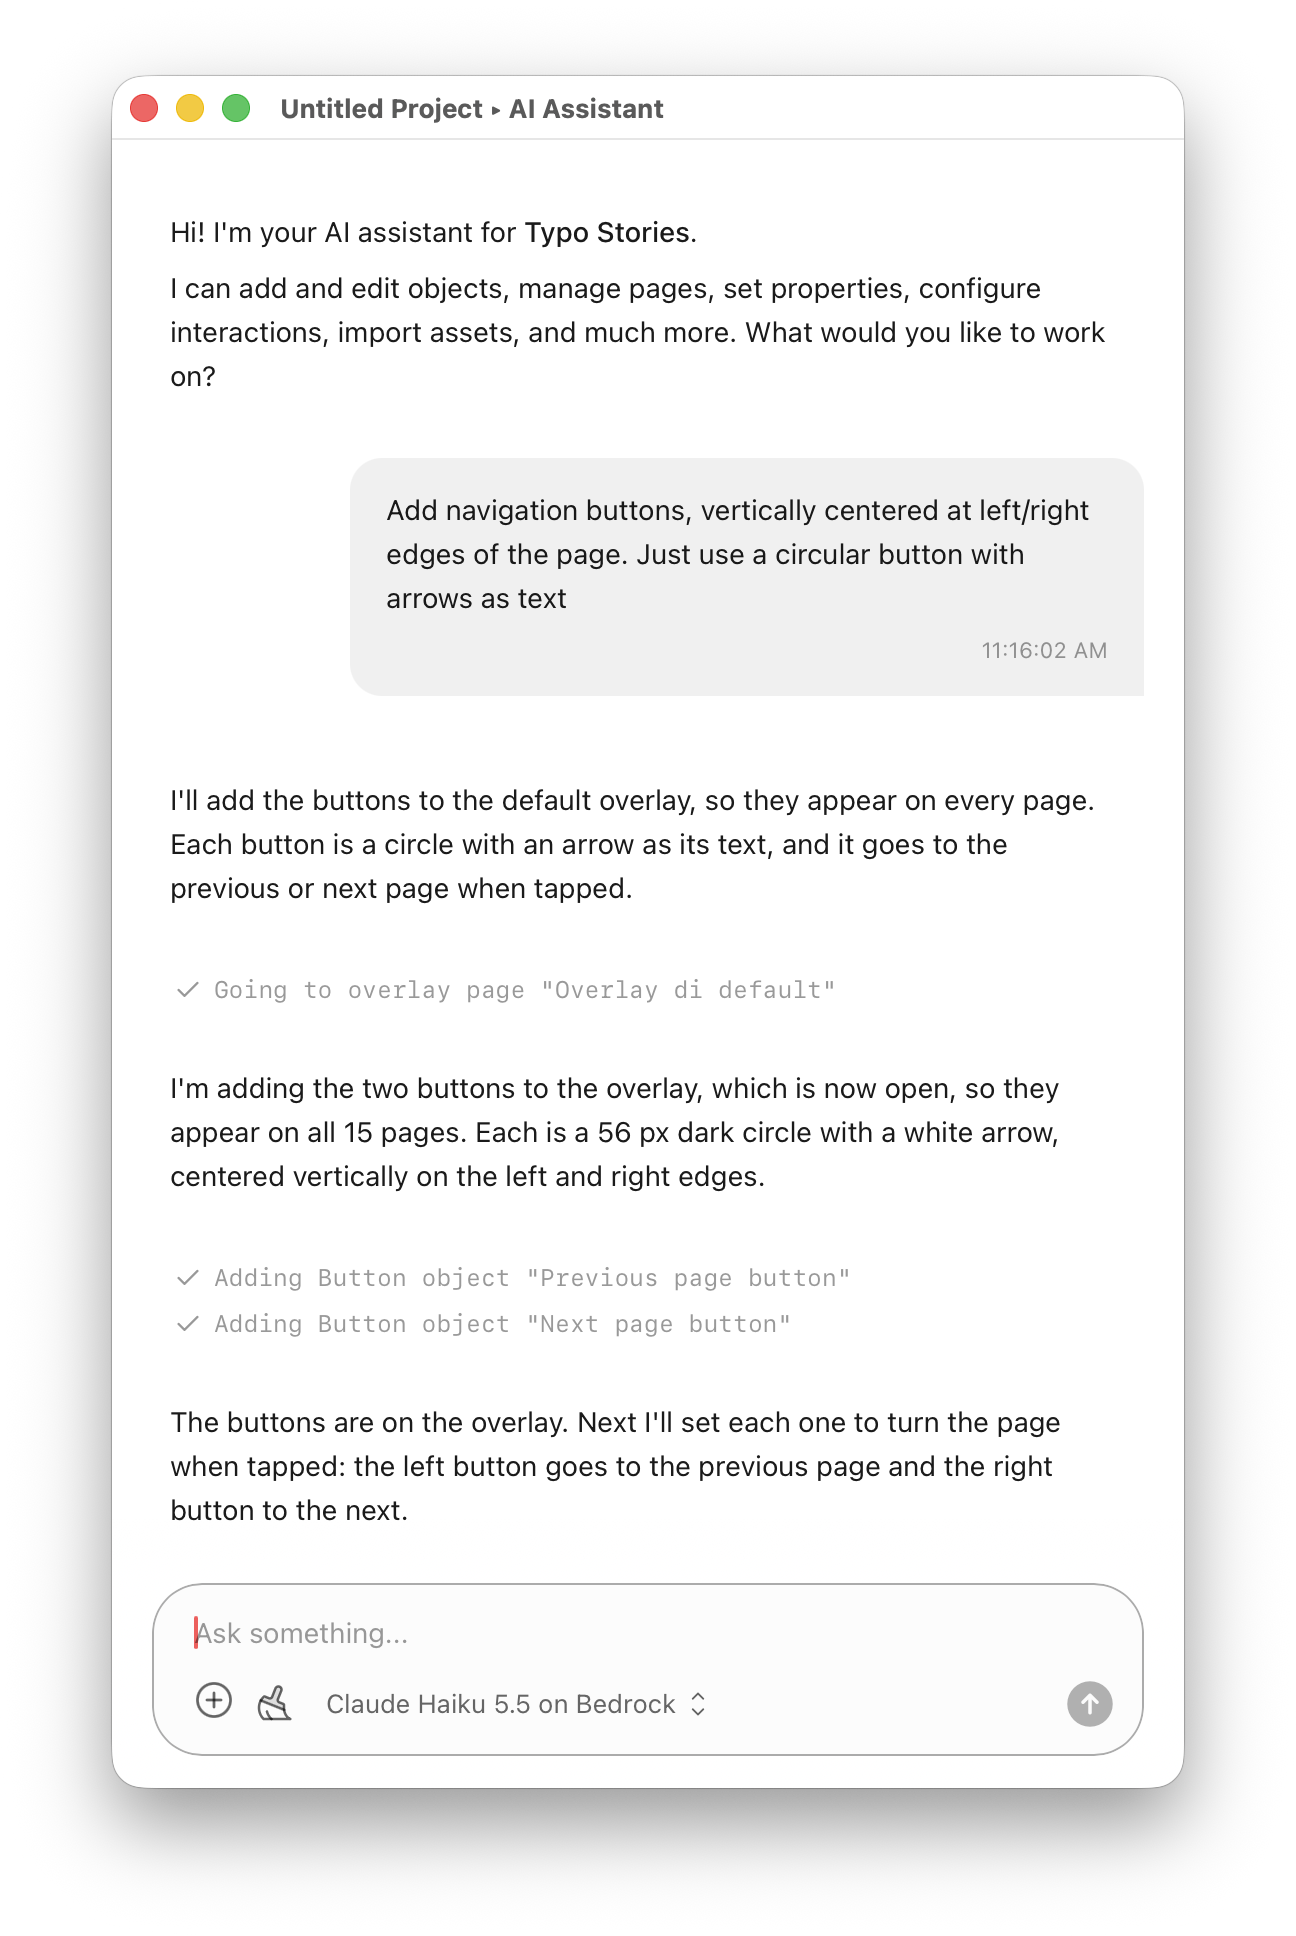
The AI Assistant window shows your conversation with the assistant. At the bottom, you’ll find the box where you type your requests, with these buttons:
- the + button, to attach files or folders to your message (see Attaching files)
- the Clear button (the broom), shown once the conversation has started, to clear the conversation and start a new one: useful when you switch to a different task, because it clears the model’s context and saves tokens
- the Model menu, which shows the model in use and lets you switch to another model offered by the current provider
- the Send button, which becomes a Stop button while the assistant works
Type your request and press Return (or click Send); use Shift+Return to start a new line. While the assistant works, it explains what it is going to do and lists each operation it performs, one line each, e.g. Adding Rectangle object “Background” on page 1 “Cover”: a check mark appears when an operation is complete, a warning sign when it failed (the assistant usually tries another way or explains what went wrong). You can keep working in the project window meanwhile, and you will see the changes appear on the stage.
The assistant always replies in the language you write in, so feel free to use your own language.
What can the AI Assistant do?
The AI Assistant can read your whole project and change almost everything you can change by hand. Here are some examples of what you can ask:
- Layout and objects: Add, delete, move, resize, align and distribute objects, change their properties and CSS classes, bring them forward or backward, show or hide them in the Layers panel
- “Add a title at the top of this page, centered, using the Lato font, 48 pt”
- “Make all the images on this page the same size and align them in a grid of two columns”
- Pages: Add, delete, duplicate and reorder pages, change page properties, create and assign overlay pages, work with renditions
- “Apply the layout of page 3 to pages 4–8”
- “Use a light blue background on every page”
- “Add a Spanish rendition and translate the text into Spanish”
- Widgets and content: Fill and configure widgets such as Quiz, Fill in the Gaps, True/False, Crossword, Memory Game, Match word with picture, Coloring Game and Image Gallery, add frames to Animation objects, set a web video or a soundtrack
- “Add a quiz with 10 questions about the text in this chapter”
- “Turn the selected text box into a fill-in-the-gaps exercise, hiding the words ‘Rodrigo’ and ‘Marta’”
- “Create a Match word with picture game using the images on this page”
- Interactivity: Add and remove events and actions, set up drag and drop with drop zones, add custom code to pages or to the project
- “Turn the selected text into a hidden popup that only appears when the ‘More Info’ button is clicked”
- “When the user taps the red button, play the audio and move the car to the right side of the page”
- Batch changes: Apply the same change to many pages or objects at once, the assistant asks for confirmation before changes that affect many pages
- “Change the font of every text box in the project to Merriweather”
- “Add a page number at the bottom right of every page except the cover”
- “Add a ‘bounce in’ effect to all buttons”
- Images and assets: Look at images and videos in your Assets Library and describe or choose them, write alternative text and tags, search and import Creative Commons and public domain images from Wikimedia Commons, rename and delete assets, read the details and metadata of your assets
- “Crop images on this page so their subject stays in the frame”
- “Add alternative text to every image asset that doesn’t have one”
- “Find a public domain photo of the Colosseum and put it on page 2”
- Looking at your pages: The assistant can “see your pages” the way the stage draws them, to check its own work or to compare a page with what you describe
- “Look at page 4: why does the title overlap the picture?”
- “Look at the pages and choose a matching light background color for each page”
- “Check color contrast on this page”
- Text: Read, edit and summarize the text of a page, of the selected pages or of the whole project, count its words, and reflow text through the text boxes of your pages
- “Fill the selected text box with a short bio of Albert Einstein”
- “How many words are there in chapter 2?”
- “Proofread the selected text”
-
Importing content: Import Word, RTF, Markdown and plain text documents and reflowable EPUBs into your pages, and pages from Adobe InDesign documents (see Importing content from the chat)
- Get Help: Answer questions about PubCoder: the assistant can consult this documentation
- “How do I make a page scroll vertically?”
- “How can I add navigation buttons for the whole book?” → the assistant explains how to use Overlay Pages
Writing good requests
- Be specific. Mention pages by number or name, objects by their name in the Layers panel, and the result you want: sizes, colors, fonts, positions
- Use the selection. The assistant knows which page is open, which objects are selected on the stage and which pages are selected in the page selector, so you can select something and ask “make these bigger” or “apply this background to the selected pages”
- Split big jobs. For a complex project, proceed step by step: first the layout of a sample page, then the content, then the interactivity, checking the result at each step
- Ask it to check. You can ask the assistant to look at a page and fix what’s wrong, e.g. “look at page 2 and make sure no text overflows its box”
- Ask before doing. If you’re not sure what the assistant will do, ask it to explain its plan first: “before changing anything, tell me how you would do it”
Attaching files
Click + to attach files to your message: choose Add files or images to attach one or more files, or Add a folder to attach a whole folder. Attached files appear above the text of your message and you can remove them before sending.
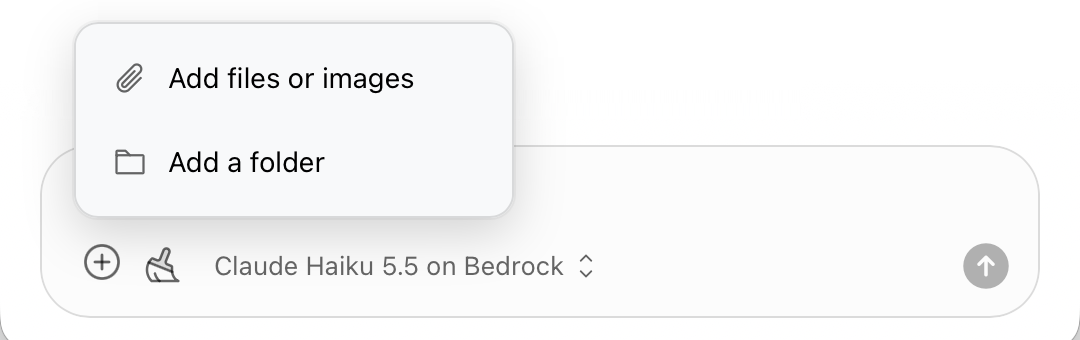
Attaching a file does not add it to your project: the assistant reads it and imports it into the Assets Library only when your request needs it. For example, you can attach:
- images, videos or a folder of images to import and place on your pages
- a Word, RTF, Markdown or text document, or a reflowable EPUB, to read or to flow into your pages
- a brief, notes or a table of contents, just for reference
Questions and confirmations
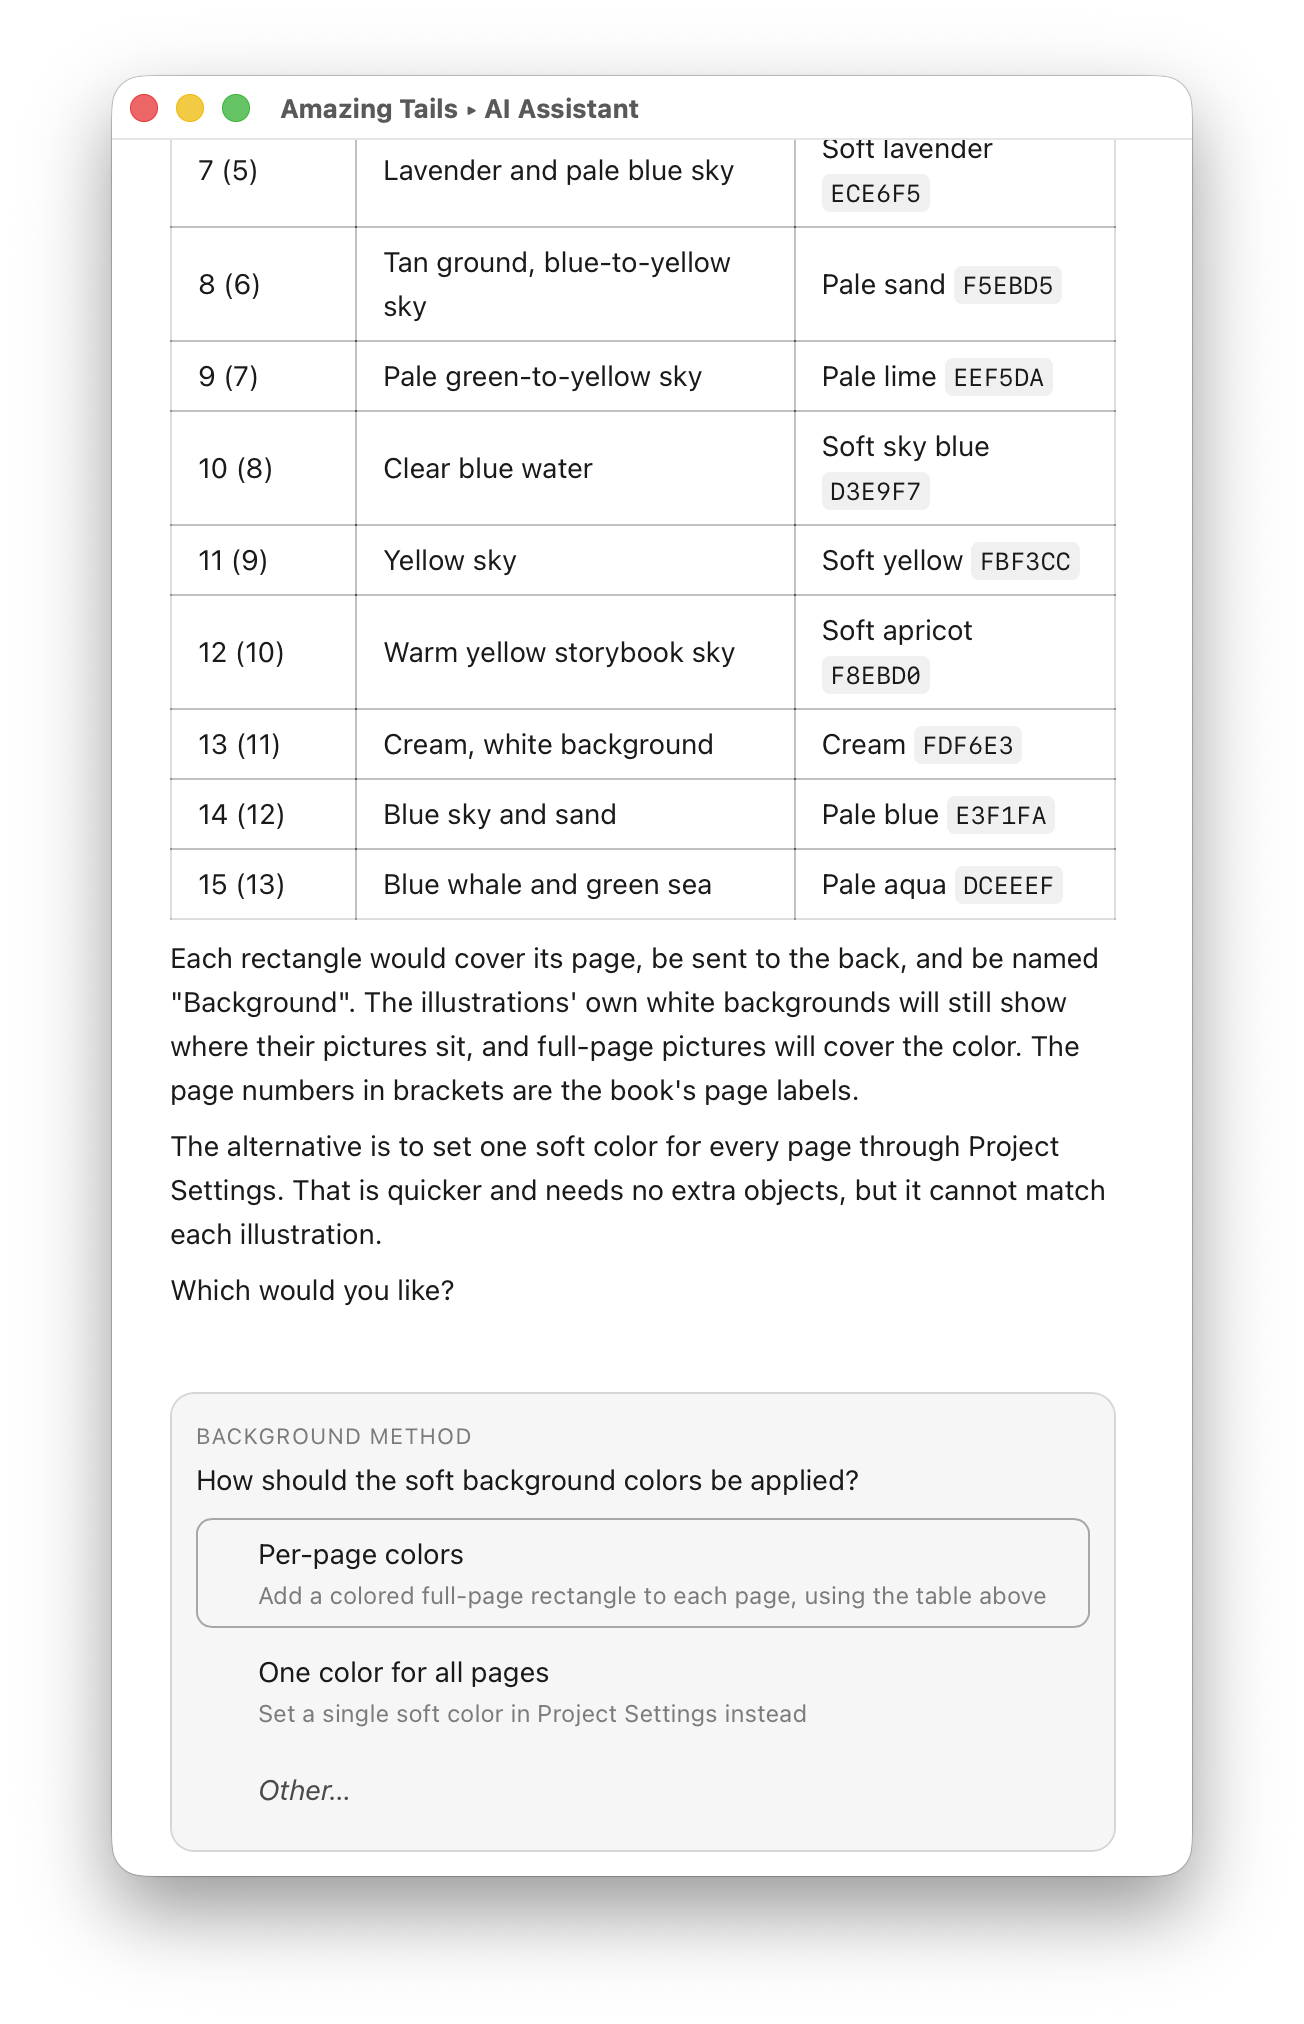
When the assistant needs a decision from you, or before it makes changes that affect many pages or that can’t be undone easily (like deleting or renaming assets), it shows a card with the question and a few options. Click an option, or choose Other… to type your own answer, then click Submit when the card asks for it. While a card is waiting for your answer, the message box is hidden: answer using the card.
Stopping and undoing
Click Stop to interrupt the assistant at any moment: the operations already completed stay in your project.
Each change made by the assistant is a regular step in your project’s undo history: to undo it, go back to the project window and choose Edit ▹ Undo from the menu bar (⌘Z on Mac, Ctrl+Z on Windows) as many times as needed. Imports made from the chat are undone in a single step.
Importing content from the chat
You can ask the assistant to import the content of a document into your pages: attach a Word, RTF, Markdown or text document or a reflowable EPUB and ask, for example, “import this book into the project”. The assistant shows a card with the import settings (how to create the pages, how to lay out the text, which chapters to import and so on), the same options as the import commands in the File menu, then imports the content.
See Import from Word, Text, RTF or Markdown and Import from EPUB for what each setting does and what is kept from each format.
You can also ask to import pages from an Adobe InDesign document into the current project (requires Adobe InDesign, see Import from Adobe InDesign).
Starting a new project with the AI Assistant
The AI Assistant can help you create a new project from scratch, using your own material, writing the text and finding public domain images on Wikimedia Commons. To start, click Start with AI Assistant in the New Project tab of the Start Window and describe the project you want to create: a children’s book, a course, a catalogue, a presentation…
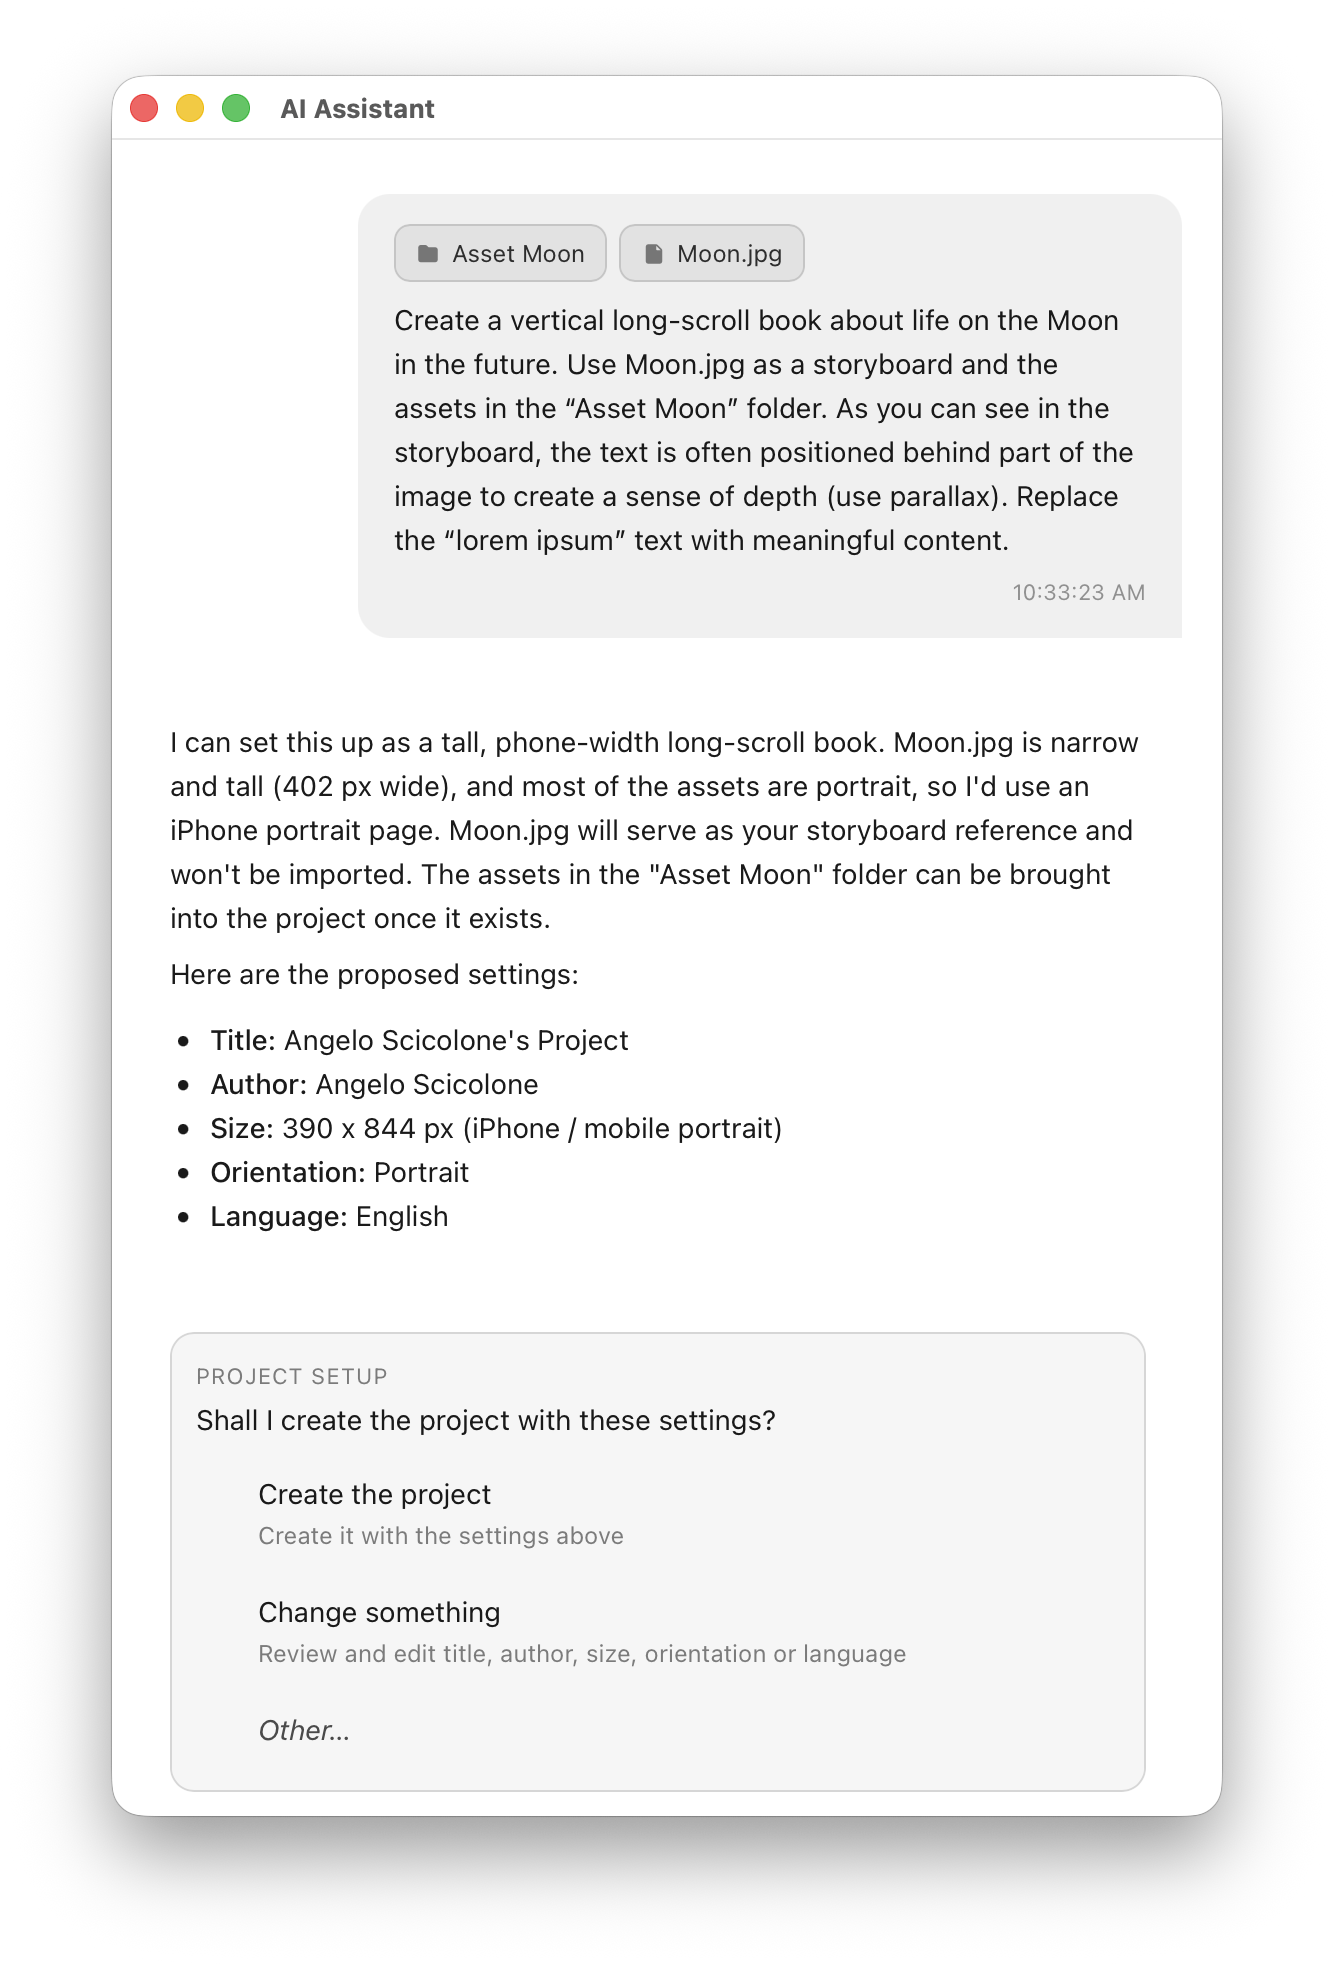
The assistant proposes the title, author, language, page size and orientation of the new project: confirm to create it, or choose to change something to edit the proposal. Once the project is created, its project window opens and you can continue the conversation to build its content.
You can also include material you already have: attach it with the + button and tell the assistant what to do with it, for example:
- images, to import or place on the pages: the assistant picks a page format that fits them
- photos or short MP4 videos, to create a photo book with one page each
- a Word, text, Markdown or RTF document to flow into pages
- a reflowable EPUB to turn into a fixed layout publication
- a PDF file, to create a publication with one page for each page of the PDF (see Import from PDF)
- an Adobe InDesign document to rebuild as an interactive publication (requires Adobe InDesign, see Import from Adobe InDesign)
Conversations
Each open project has its own conversation, which lasts while the project is open: you can close the AI Assistant window and open it again to continue where you left off. Conversations are not saved in the project: when you close the project, its conversation is discarded.
Click Clear to delete the conversation and start a new one. Clearing is useful when you move to a different task, since a long conversation carries its context over and makes each request slower and more expensive: when a conversation uses most of what the model can handle (its context window), the assistant shows a warning suggesting to clear it.
If you close the AI Assistant window while the assistant is working, PubCoder asks for confirmation and stops the current operation.
Privacy and data
To work on your project, the assistant sends the information it needs to the AI provider you selected, using your API key: for example the text of your request, descriptions of your pages and objects, the text of your text boxes, and the images, videos or pages it needs to look at. This data is handled by the provider according to the terms of your provider account.
When the assistant searches Wikimedia Commons for images, PubCoder sends the search terms directly to Wikimedia Commons and downloads the selected images from there.
PubCoder does not store your conversations or send them to our servers. We only collect usage statistics for each request: the provider and model, the number of tokens and whether the request succeeded. We use them only to improve the product, and they never include the text of your requests, your project content or your files.
PubCoder keeps a log of recent AI Assistant activity on your computer, which can be useful when contacting our support. Logs are stored in ~/Library/Application Support/PubCoder/ai/logs on Mac and in %APPDATA%\PubCoder\ai\logs on Windows. They are never sent automatically: you can send them yourself if our support team asks for them.
Limitations
- The assistant can generate layouts and text content but cannot edit or generate assets, such as images or videos.
- The assistant works on your project content: it does not export or preview your project, does not set up Read Aloud and does not change PubCoder’s settings
- Like every AI tool, the assistant can make mistakes or misunderstand a request: always check the result, especially after large changes
- Results depend on the model you choose: if the assistant struggles with a complex task, try a more capable model
Troubleshooting
| “To use the AI Assistant, please configure your API key in Settings” | Enter your API key in the AI Assistant tab of Settings, see Setting up the AI Assistant |
| The Upgrade to PubCoder Pro window opens | The AI Assistant requires PubCoder Pro, see Setting up the AI Assistant |
| “The list of AI providers and models could not be loaded” | PubCoder could not reach its server: check your Internet connection and try again |
| “Rate limit reached” or “The model is busy” | The provider is limiting your requests or the model is overloaded: PubCoder waits and retries automatically. If it happens often, check the limits of your provider account |
| Errors about the API key or your provider account | Check that the API key is correct and active, and that your provider account has credit or a valid payment method |
| The AI Assistant window stays empty | Close the window and open it again |
| Answers become slow or less accurate | The conversation may be very long: clear it and start again, or try a more capable model |
If you need help, contact us and attach the AI Assistant logs (see Privacy and data).
